 Removing the Thermal-Cooling Assembly
Dell™ XPS™ M1210 Service Manual
 Removing the Thermal-Cooling Assembly
 Replacing the Thermal-Cooling Assembly

|
CAUTION: Before you begin the following procedure, follow the safety instructions in the Product Information Guide. |

|
NOTICE: To avoid electrostatic discharge, ground yourself by using a wrist grounding strap or by periodically touching an unpainted metal surface (such as the back panel) on the computer. |

|
NOTICE: To help prevent damage to the system board, remove the main battery (see Before Working Inside Your Computer) before working inside the computer. |

|
NOTE: The thermal-cooling assembly differs in appearance depending on your computer's video configuration. To determine your computer's video configuration, see "Determining Your Computer's Configuration" in the Owner's Manual for your computer. |

|
NOTE: If the thermal-cooling assembly in your computer has a fifth screw and securing clip, go to step 7. Otherwise, skip to step 8. |

|
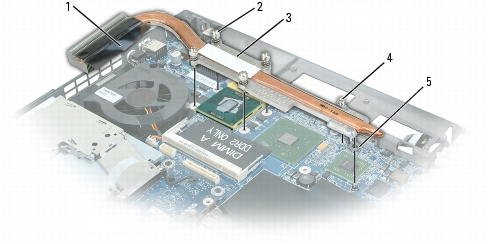
1 |
mylar tape |
2 |
captive screws (4) |
3 |
thermal-cooling assembly |
|
4 |
captive screw (1) (present only on computers with discrete video) |
5 |
securing loop (present only on computers with discrete video) |
|
|

|
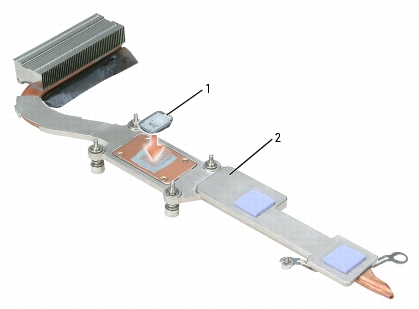
NOTE: You can place the new thermal pads directly on any existing thermal pads already installed on the thermal-cooling assembly. It is not necessary to remove an existing pad or to clean the surface. |

|
1 |
thermal pads (3) |
2 |
underside of thermal-cooling assembly |

|
NOTE: When replacing the thermal-cooling assembly, hold up the mylar flap on the thermal-cooling assembly so that the flap rests on top of the fan when the thermal-cooling assembly is in place. |